This short blog entry will be one of many hopefully about my journey using modern open source tools to develop some cool embedded projects in cpp or other languages. The first entry in the series will focus on getting a simple led blink example working. The aim is to use Visual Studio Code as IDE and cmake, arm-gcc, and openocd for compling & debugging.
Short background and my long term goal
The last 10years of my professional live (and also while studying) i mainly programmed bare metal embedded system using commercial solutions like Keil µVision or IAR.
I started with developing code for 8051, then MSP430 and the last few years Cortex M0+ based SoC (NRF51/STM32). All these projects were developed in C.
For our new projects inside the company I and my collegues introduced a new modular architecture, which uses a lot of object oriented ideas and abstraction levels. This allows us now to develop similiar application for different target Platforms, and have an reusable driver library for the existing Hardware. The EnOcean Multisensor and Motion Detector were one of the first products using this architecture.
But still the code is mainly based in c, and lot of the code feels like “boiler plate” code to make object oriented work with c. There was a decision to still use c in our company as we still had some compiler which did not support c++ when starting the project.
This did lead to that i did not develop a lot c++ code the last few years, and i want to broaden my knowledge in it. For this reason i want to create an hobby project in modern cpp, using as much as possible state of the art of approaches.
My aim is to develop on the STM32-Discovyboard a nice live spectogram of sound.
I will keep pushing the code updates to my github profile.
What i want to learn
- Using CMake + Visual studio code
- Modern c++ development of embedded
- GCC/GDB/CLANG debugging on low level
- Using docker container for my build setup
- Building a small kubernet cluster for continues integration
- Simulation running in renode and automated testing with robotframework
Tools you will need
To get started you will need some “development” board ( i used one from st), and the Software
- STM32F429 Discoveryboard
- STM32CubeMx to get the low level files
- Visual Studio Code and following extensions
- Compiler either clang or arm-none-gcc
- CMake
- Ninja or mingw for make
- OpenOCD (i used the sysprog build). (I tried stlink utiltiy but i was not able to get i to work)
Getting started
Installing and setting up the path
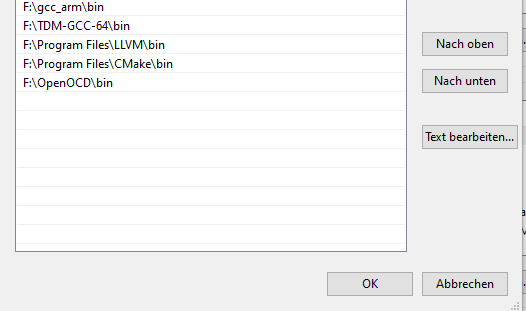
Install all the programs and i highly recommend for laziness to add them all into your %PATH%.
Adding files, preparing the build
Open up Visual studio code and add your source files. For a minimal you can either use my tag or prepare the source as you think you will need it. You can also check this blog entry about export the make file https://dev.to/younup/cmake-on-stm32-the-beginning-3766 .
When you added your sourcecode is time to create a CMAKE file to list your source and include paths.
cmake_minimum_required(VERSION 3.15.3)

project(discovery)

enable_language(C ASM)
set(CMAKE_C_STANDARD 99)
set(CMAKE_C_STANDARD_REQUIRED ON)
set(CMAKE_C_EXTENSIONS OFF)

set(src
  startup_stm32f429xx.s

  system_stm32f4xx.c
  drivers/hal/CMSIS/Device/ST/STM32F4xx/Include/stm32f4xx.h

  main.cpp)

set(EXECUTABLE ${PROJECT_NAME}.elf)

add_executable(${EXECUTABLE} ${src})

target_compile_definitions(${EXECUTABLE} PRIVATE
        -DUSE_HAL_DRIVER
        -DSTM32F429xx
        )

target_include_directories(${EXECUTABLE} PRIVATE
        drivers/hal/STM32F4xx_HAL_Driver/Inc
        drivers/hal/CMSIS/Device/ST/STM32F4xx/Include
        drivers/hal/CMSIS/Include
        ./
        )

target_compile_options(${EXECUTABLE} PRIVATE
        -mcpu=cortex-m4
        -mthumb
        -mfpu=fpv4-sp-d16
        -mfloat-abi=hard

        -fdata-sections
        -ffunction-sections

        -Wall

        $<$<CONFIG:Debug>:-Og>
        )

target_link_options(${EXECUTABLE} PRIVATE
        -T${CMAKE_SOURCE_DIR}/STM32F429ZITx_FLASH.ld
        -mcpu=cortex-m4
        -mthumb
        -mfpu=fpv4-sp-d16
        -mfloat-abi=hard
        -specs=nano.specs
        -lc
        -lm
        -lnosys
        -Wl,-Map=${PROJECT_NAME}.map,--cref
        -Wl,--gc-sections
        )

# Print executable size
add_custom_command(TARGET ${EXECUTABLE}
        POST_BUILD
        COMMAND arm-none-eabi-size ${EXECUTABLE})

# Create hex file
add_custom_command(TARGET ${EXECUTABLE}
        POST_BUILD
        COMMAND arm-none-eabi-objcopy -O ihex ${EXECUTABLE} ${PROJECT_NAME}.hex)
What i also suggest is you create a ToolChain file for the target. Using the kits with cross compiling was at least not a succes for me.
set(CMAKE_SYSTEM_NAME Generic)
set(CMAKE_SYSTEM_PROCESSOR ARM)

if(MINGW OR CYGWIN OR WIN32)
    set(UTIL_SEARCH_CMD where)
elseif(UNIX OR APPLE)
    set(UTIL_SEARCH_CMD which)
endif()

set(TOOLCHAIN_PREFIX arm-none-eabi-)

execute_process(
  COMMAND ${UTIL_SEARCH_CMD} ${TOOLCHAIN_PREFIX}gcc
  OUTPUT_VARIABLE BINUTILS_PATH
  OUTPUT_STRIP_TRAILING_WHITESPACE
)

get_filename_component(ARM_TOOLCHAIN_DIR ${BINUTILS_PATH} DIRECTORY)

set(CMAKE_EXE_LINKER_FLAGS "--specs=nosys.specs" CACHE INTERNAL "")
set(CMAKE_C_COMPILER ${TOOLCHAIN_PREFIX}gcc)
set(CMAKE_ASM_COMPILER ${CMAKE_C_COMPILER})
set(CMAKE_CXX_COMPILER ${TOOLCHAIN_PREFIX}g++)

set(CMAKE_OBJCOPY ${ARM_TOOLCHAIN_DIR}/${TOOLCHAIN_PREFIX}objcopy CACHE INTERNAL "objcopy tool")
set(CMAKE_SIZE_UTIL ${ARM_TOOLCHAIN_DIR}/${TOOLCHAIN_PREFIX}size CACHE INTERNAL "size tool")

set(CMAKE_FIND_ROOT_PATH ${BINUTILS_PATH})
set(CMAKE_FIND_ROOT_PATH_MODE_PROGRAM NEVER)
set(CMAKE_FIND_ROOT_PATH_MODE_LIBRARY ONLY)
set(CMAKE_FIND_ROOT_PATH_MODE_INCLUDE ONLY)
As next step update the cmake kits for your visual studio
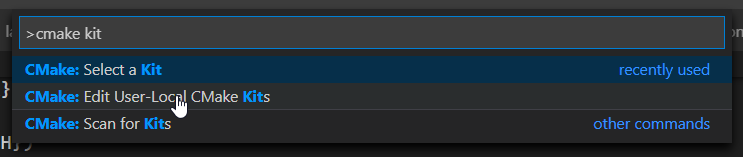
Here add the toolchain file as direct link
{
    "name": "arm-gcc-local",
    "toolchainFile": "F:/embedded/embedded_spectogram/Firmware/arm-none-eabi-gcc.cmake"
}
Next select the kit, and build the project once. If the setup was correct it should generate an hex file.

Setting up the debugger
If you have not launch.json in your project, create it. Here you have to setup the debuger. For my project and the STM32F4 Discovery board i use i have the following file.
{
    // Use IntelliSense to learn about possible attributes.
    // Hover to view descriptions of existing attributes.
    // For more information, visit: https://go.microsoft.com/fwlink/?linkid=830387
    "version": "0.2.0",
    "configurations": [
        {
            "name": "Cortex Debug",
            "cwd": "${workspaceRoot}",
            "request": "launch",
            "type": "cortex-debug",
            "servertype": "openocd",
            "executable": "./build/discopvery.elf",
            "device": "STM32F429",
            "svdFile": "Firmware/bsp/STM32F429.svd",
            "runToMain": true,
            "configFiles" : ["board\\stm32f429discovery.cfg"],
        }
    ]
}
Important is that you download or get the right “SVD” file, which describes your registers. For STM32 chips it’s part of the driver files. If you use another microcontroller family, normally they should support some cmis support files or download a software pack from keil which should contain it.
The board files are part of openocd and you will find it in the openocd folder (openocd\share\scripts\boards). Select one which mathcs your file. The executable should be your slf file.
If you did setup your build correclty and debug configuration pressing F5 you should be able to debug now.
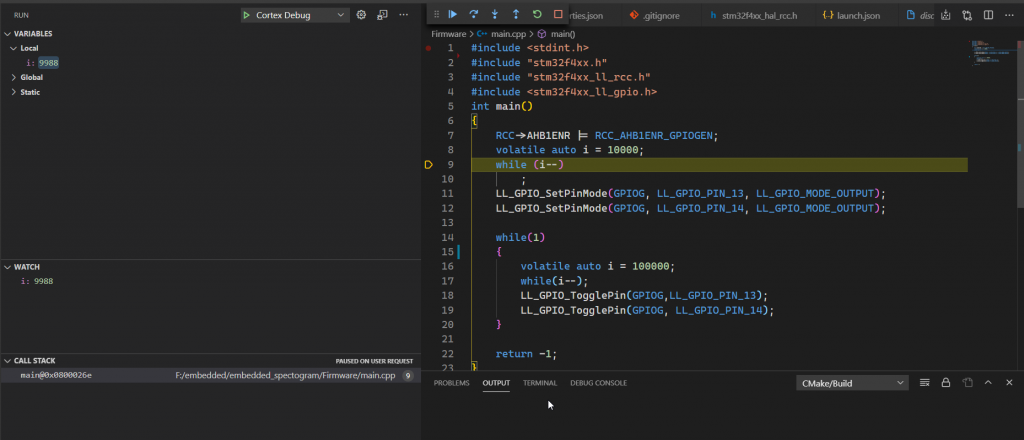
My example
My first test program is always to let some LEDS blink, i used for my first test the STM32 Low level library to toggle the GPIOG pins which connect to the red/ green led.
#include <stdint.h>
#include "stm32f4xx.h"
#include "stm32f4xx_ll_rcc.h"
#include <stm32f4xx_ll_gpio.h>
int main()
{
    RCC->AHB1ENR |= RCC_AHB1ENR_GPIOGEN;
    volatile auto i = 10000;
    while (i--)
        ;
    LL_GPIO_SetPinMode(GPIOG, LL_GPIO_PIN_13, LL_GPIO_MODE_OUTPUT);
    LL_GPIO_SetPinMode(GPIOG, LL_GPIO_PIN_14, LL_GPIO_MODE_OUTPUT);

    while(1)
    {
        volatile auto i = 100000;
        while(i--);
        LL_GPIO_TogglePin(GPIOG,LL_GPIO_PIN_13);
        LL_GPIO_TogglePin(GPIOG, LL_GPIO_PIN_14);
    }

    return -1;
}
Using cmake build and then launch (F7+F5) i can sucessfully debug my program.
Next step will be making the build chain a docker container, so the build can be reproduced always with the same “file”.
0 thoughts on “Visual Studio Code, Windows, bare metal arm developlement”